Integriti / GateKeeper - User Management
Creating a user
A user is any person that will interact with the Integriti system via a keypad or card reader. The User Editor window allows you to assign the user a PIN number, access card, user permissions or even a photo. To create a new user from System Designer, navigate to the Home tab then click the Users icon, this will open the Users List. Click the Add button to open the User Editor window containing a blank user record.

To create a new user from GateKeeper, navigate to the Users tab then click the Users icon, this will open the Users List. Click the Add button to open the User Editor window containing a blank user record.

User Editor Window
The top left section of the User Editor window contains the basic user information.
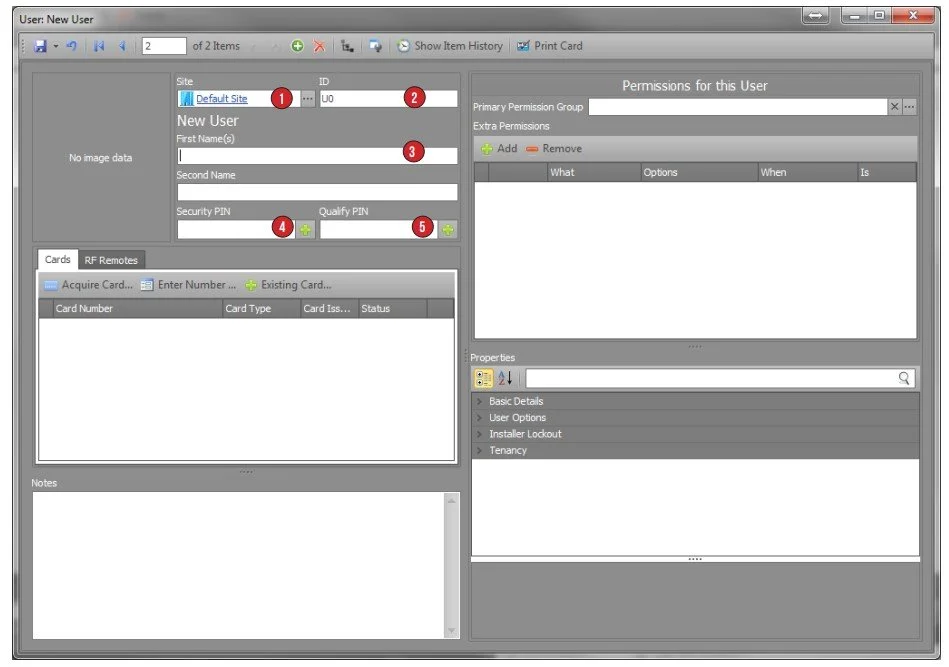
The Site field is used to associate a user with a site or sub-site, this will not have any impact on the user. The user will only be visible in the software if the operator logged in has permission to view users from that sub-site.
The ID field is a unique number that you can use to identify the users. Each time you add a new user, the user will be given the next available number. The ID field is just a number that has no effect on the user.
The First & Second Name fields are where you enter the user’s first and last name. To create a new user from GateKeeper, navigate to the Users tab then click the Users icon, this will open the Users List. Click the Add button to open the User Editor window containing a blank user record.
The Security PIN is required for a user to interact with the Integriti system via a keypad. If the user needs to be able to arm or disarm areas from the keypad, you will need to assign the user a security PIN and a menu group. There is no minimum or maximum length for a Security PIN by default; however your system may have been configured to have a fixed PIN code length. If you enter a Security PIN that is either too long or too short the following error will occur.
The Qualify PIN can be used instead of the Security PIN when entering a door that requires the user to enter a PIN to unlock. The qualify PIN is used so that the PIN number that is used for keypad access can be different to the PIN number used for door access. Please check with your installer if you are unsure if you need to use the qualify PIN.
Assigning User permissions
The Permissions for this User window is divided into two sections, the Primary Permission Group and the Extra Permissions. It is important to understand the structure of permissions before assigning permissions to a user
1 : Primary Permission Group
The Primary Permission Group option is where a user’s permissions are usually assigned. This field only allows you to assign a single permission group, in most cases a user will be assigned a primary permission group based on their role in the company.
2 : Extra Permissions
The Extra Permissions section lets you allow or deny permissions for items independent of the primary permission group. This feature is commonly used to reduce the number of permission groups within the Integriti system. If two users have similar roles, for example Warehouse Staff and Warehouse Manager, they can both be assigned the same primary permission group. You would then add extra permissions for the additional doors and areas that the Warehouse Manager needs. The extra permissions use the same What & When structure as in the permission group programming.

Assigning Cards to Users
Once a user has been created and programmed, the next step is to assign them a card. There are numerous card formats and card types in Integriti, therefore, there is more than one way for you to assign a card to a user. The following methods for assigning cards will depend on the types of cards you currently use on-site. Check with your installer to confirm which method is correct for you.
Direct Entry
Direct Entry is a method of using the raw information that is read from a card by a reader. Integriti does not interpret the raw information. Direct Entry cards can not be preprogrammed in Integriti as every card needs to be badged to read its information. To assign a direct entry card to a user, click the Acquire Card button found in the Cards section of the User Editor window. The Acquire Card window provides you three methods to acquire a card.

Review: Selecting this option will scan for review messages of card badges at any reader on the site. Simply badge the card you want to assign to a user at a reader, once it appears in the list double click it to assign it to the user.
Wiegand Console Reader: If many direct entry cards are going to be assigned, it may be easier to use a Wiegand Console Reader method. The Wiegand Console Reader method uses the enrollment station that attaches to the PC via a serial port. To assign a card to a user, badge a card at the enrollment station and double-click the most recent card information.
SIFER Enrollment Station: If SIFER Cards and readers are being used, the SIFER enrollment station can be attached to a PC via a USB port to make the enrollment of many SIFER cards easier.

Once the card has been double clicked the card will appear in the Cards section of the user programming.

Site Coded Cards
Site Coded cards unlike Direct Entry cards can be preprogrammed on the Integriti System and do not require you to badge the card to assign it to a user. In some cases, the number will be printed on the card itself. If your system has been configured by your installer for site code, you will be able to enter the card number rather than badging the card to assign it to a user.
To assign a Site Coded card to a user, click the Enter Number button in the Cards section, this will open the Manual Card Entry window.
The Card Template is used to define what type of card you are assigning. In some cases there may be more than one template, this usually occurs when a combination of new and old cards are being used on a site.
The Card Number field is were you enter the unique card number. In some cases the number will be printed on the card, if it is not printed you may need to badge a card at a reader to view the card details. The Manual Card Entry window contains two fields that are required to assign a card to a user.

Use Existing Cards

When users that have cards assigned to them are deleted from the Integriti System, the card remains behind with an unallocated status or if CXI program these in for you then you will have unallocated cards available.
This unallocated card can be assigned to a new user. To assign an existing card to a user, click the Existing Card button in the Cards section. This will open the Find Entity window that displays all the unallocated cards. Select a card from the Available Cards list and click the OK button to assign it to the user.
