Inception User Guide
1. Accessing the System
The Inception system is managed through a web browser — no app or software install required. You can access it from any computer, tablet, or smartphone.
Option A — Local Network (on-site)
If your device is connected to the same network as the Inception controller:
Open a web browser
Type either the IP address of your controller into the address bar (e.g. https://192.168.1.100) or the Serial Number “.local” (eg. https://WT000027.local)
Log in with your username and password
Your IP address is recorded on your site details sheet provided by CXI at handover.
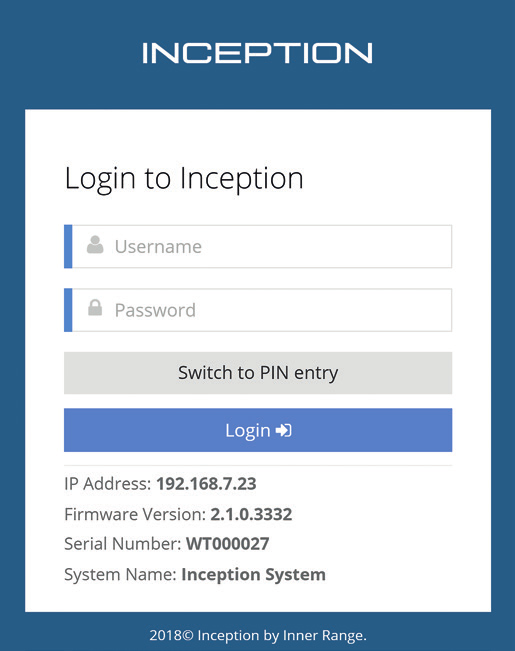
Inception login screen
Option B — Remote Access via SkyTunnel (off-site)
If your controller has internet access, you can log in from anywhere:
Open a web browser
Navigate to: https://www.skytunnel.com.au/inception/SERIALNUMBER
Replace SERIALNUMBER with your controller's serial number (format: INxxxxxxxx)
Log in with your username and password
Your serial number is recorded on your site details sheet provided by CXI at handover.
Logging In
Enter your username and password, then click Login. On touch screen devices, you can switch to PIN entry mode using the Switch to PIN Entry button.
Please note this is disabled if your system is connected to Skytunnel for security purposes. If you’re connected to CXI Cloud then this will be enabled as the device is not publicly available.
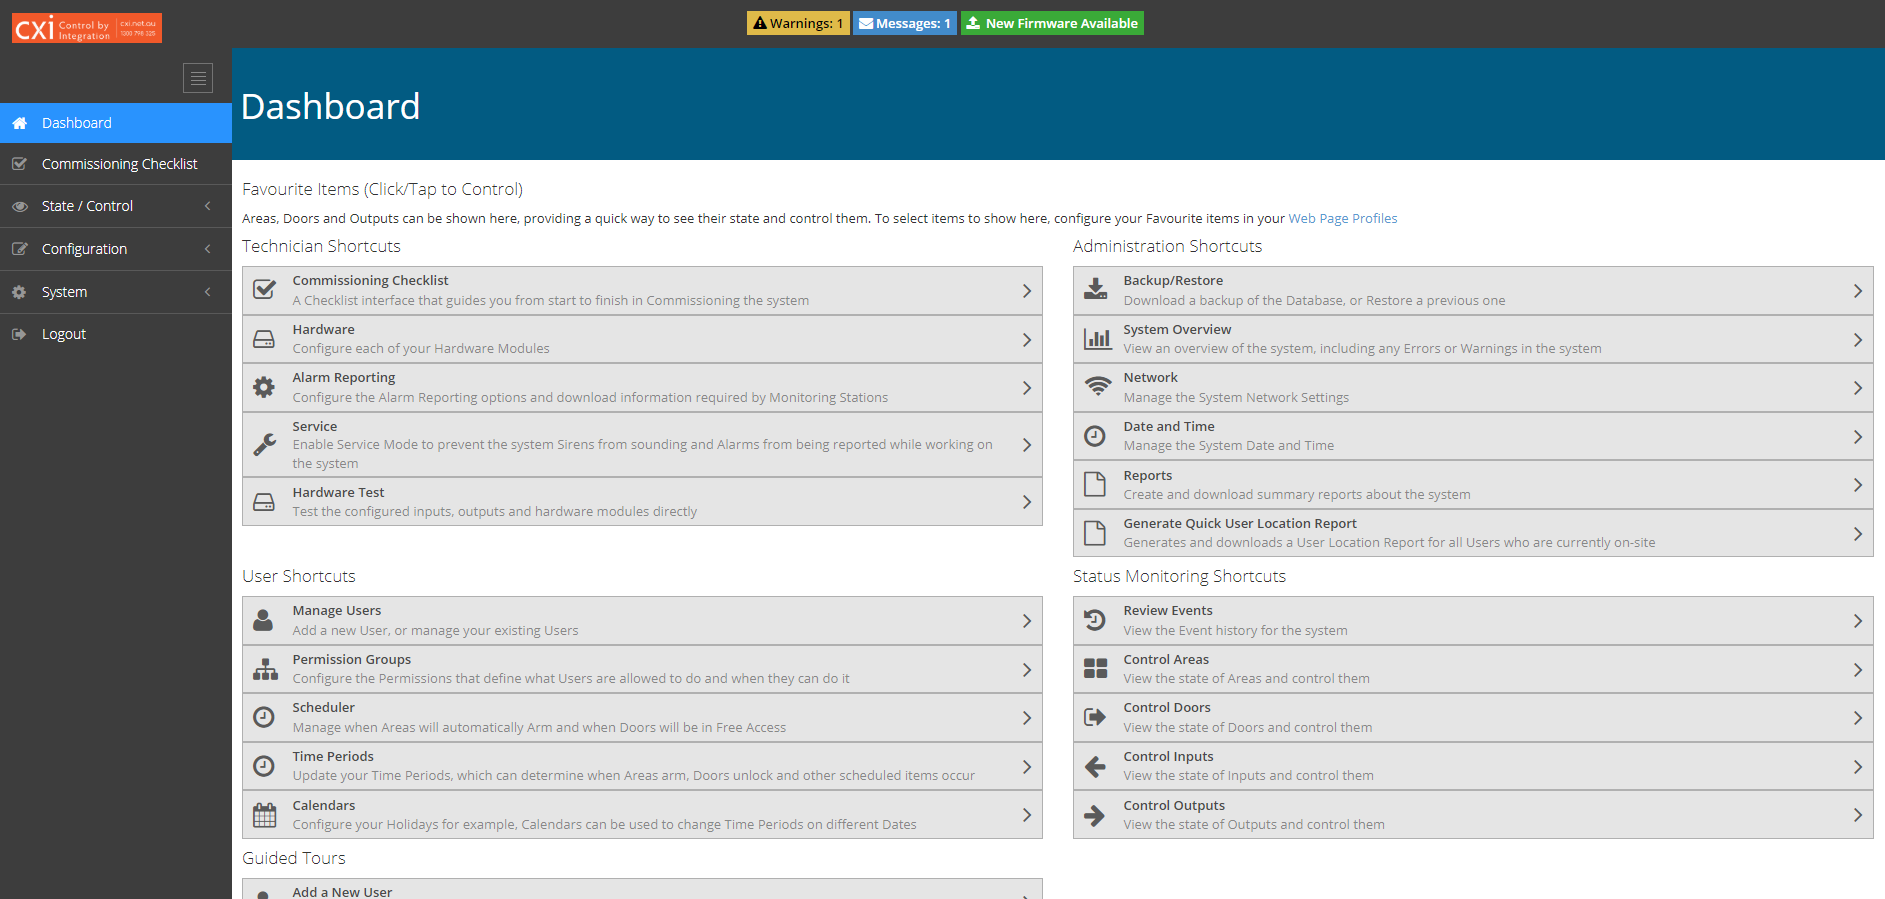
Inception Dashboard
Logging Out
Always log out when finished. Click Logout in the left navigation menu. Do not rely on simply closing the browser tab.
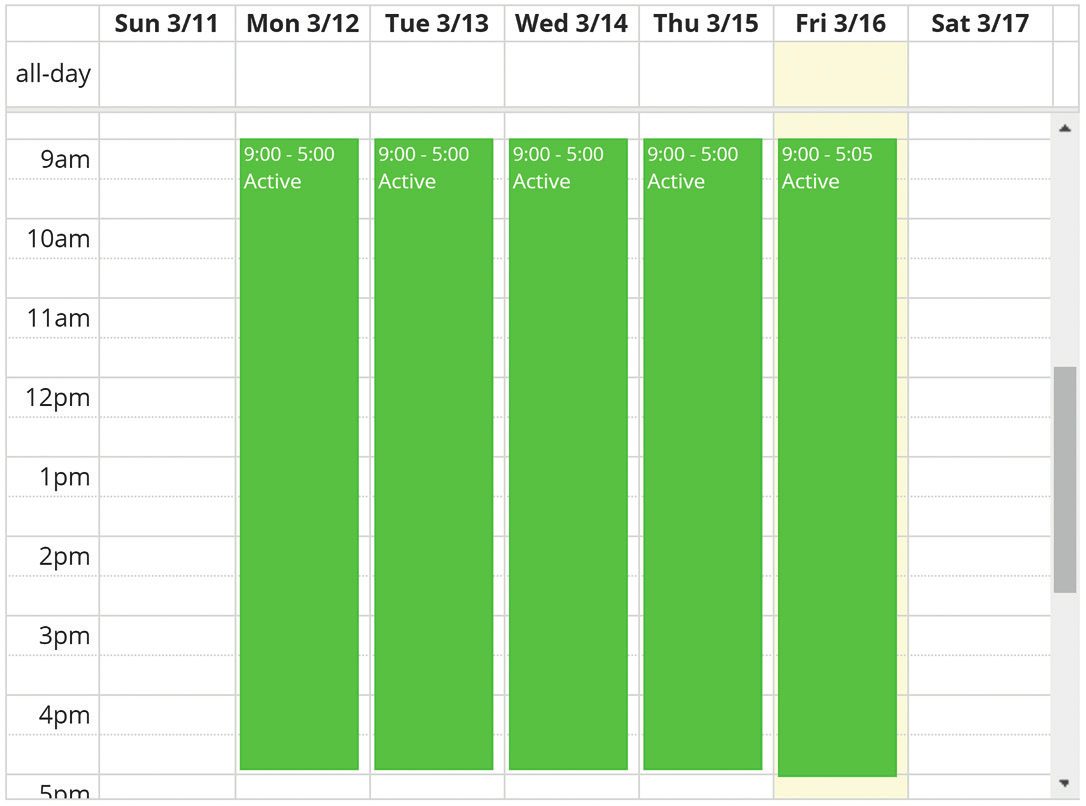
2. Arming and Disarming Areas
Areas represent physical zones in your building (e.g. office, warehouse, server room). Arming an area activates intruder detection for that zone. Disarming it allows normal movement.
From the Web Interface
Log in to the web interface
Navigate to State / Control > Control Areas
The current status of each area is displayed
Click the Quick Control button next to the area you want to control
A disarmed area will be armed
An armed area or area in alarm will be disarmed
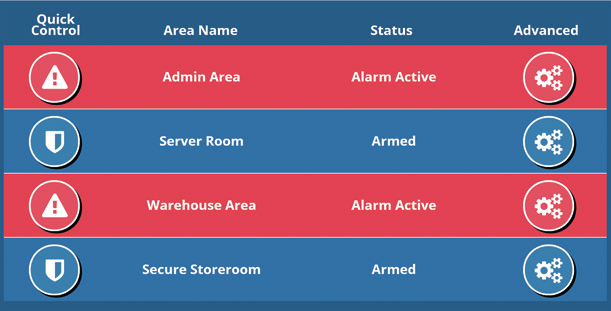
Area Control
If an Arm Attempt Fails
The system will display a reason. Common causes:
A door or window is open (unsealed input)
Someone is still in the area
Fix the issue listed and try again. If the fault cannot be resolved immediately (e.g. a faulty detector), use Isolate and Retry to override the fault and arm anyway. Contact CXI to investigate the fault as soon as possible.
From the Elite Keypad Terminal
Enter your PIN and press OK
Press MENU, then 0 to access area control
Use the up/down arrows to scroll to your area
Press ON to arm or OFF to disarm
Quick shortcut: Enter your PIN then press ON or OFF instead of OK to arm or disarm immediately.
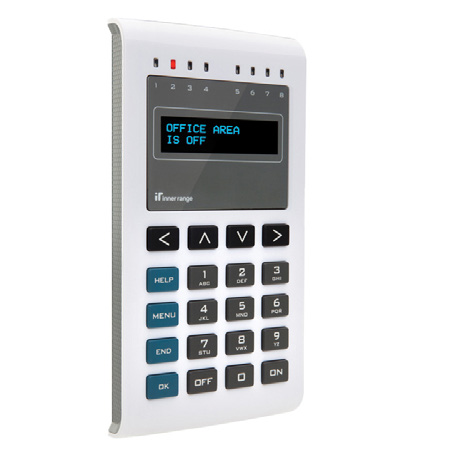
Inner Range Elite Terminal
Using Your Access Card to Arm/Disarm
Disarm: Present your card at the reader — this will unlock the door and disarm the area behind it (if configured)
Arm: Present your card three times in a row at the same reader within a few seconds
Contact CXI to confirm whether card-based area control is enabled on your system.
3. Door Control
Doors in the Inception system are electronically controlled. Access is granted based on user permissions and schedules.
Door States
-
Access requires a valid card or PIN
-
Door is open to all — no credential needed
-
No access requests will be granted (emergency use)
From the Web Interface
Log in and navigate to State / Control > Control Doors
Current door status is displayed for all doors
Click Quick Control to toggle the door state
For more options (unlock, lock, lockout, grant temporary access), click the Advanced settings icon

Inception Door Control
From the Elite Keypad Terminal
Log in with your PIN
Press MENU, 3, 2 to access door control
Use the up/down arrows to select a door
Press ON to lock, OFF to unlock, or OK to grant temporary access
Always clear overrides when they are no longer needed so doors return to their normal scheduled behaviour.
4. Managing Users
A user is anyone who interacts with the system — via access card, PIN, RF fob, or web login.
Viewing and Editing Users
Log in to the web interface
Navigate to Configuration > Users > Manage Users
Search for the user by name using the search field on the left
Click on the user to edit their details
Make changes as required, then click Save in the top toolbar
Inception Manage Users
Adding a New User
The easiest way to add a new user is via the built-in guided tour:
From the Dashboard, scroll to the bottom and click Add a New User under Guided Tours
Follow the prompts to set the user's name, assign a card or PIN, and configure their permissions
Save when complete
What Each User Can Have
-
Identifies the user in event logs
-
Used at keypad terminals (2–8 digits)
-
Presented at readers to request door access
-
Username and password for web interface access
-
Required to receive system notifications
-
Controls which doors/areas/outputs the user can access and when
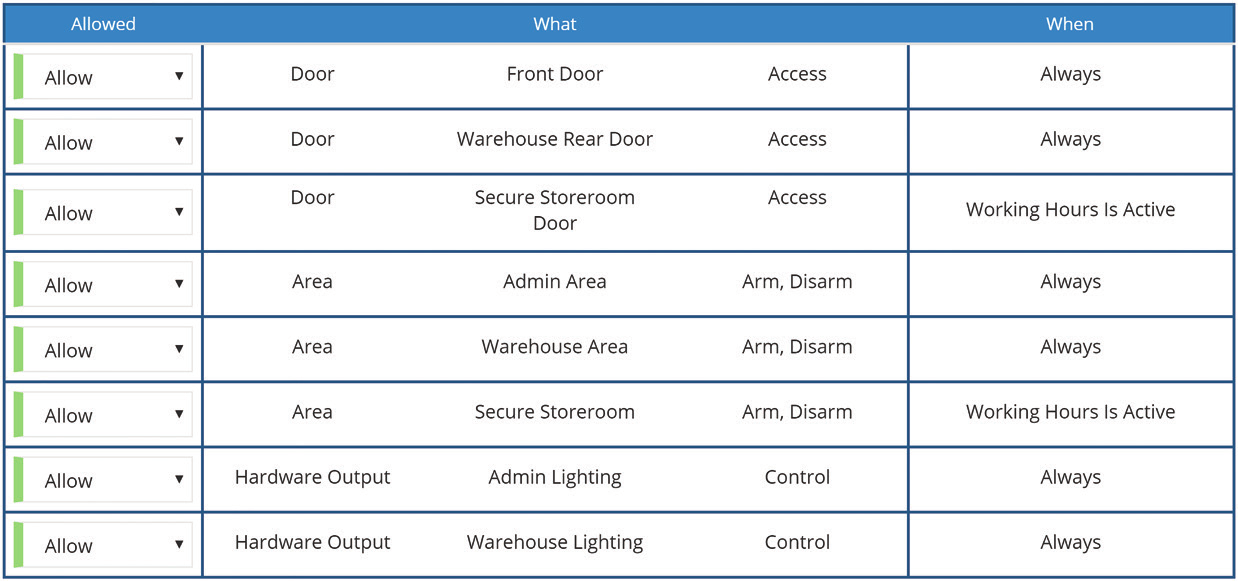
Inception Permissions Table
Adding a Card to a User
The easy way:
Present the card at any reader on site
Open the user in Manage Users
In the Credentials section, click Add From Recent Card Reads
Select the card that was just presented and save
The slightly more difficult way:
Open the user in Manage Users
In the Credentials section, click Add Items > Add Manually > select the Sifer 1001 profile > Confirm
Enter the credential number in the text box next to the Sifer 1001 section

Sifer credential number window
Disabling a credential or User
If you need to disable a user’s card, fob or remote then:
Open the user in Manage Users
In the Credentials section, click the ACTIVE option in the STATE section next to the credential you want to disable
Select the new STATE eg. Inactive - LOST
Save
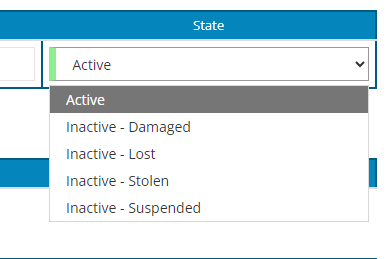
Changing the state to lost or stolen is simple.
To disable/cancel an entire user including all their cards/fobs/remotes:
Open the user in Manage Users
Navigate to Expiry / Cancellation section and select User Cancelled
Save
It is recommended to add some notes into the user’s General section for future auditing.
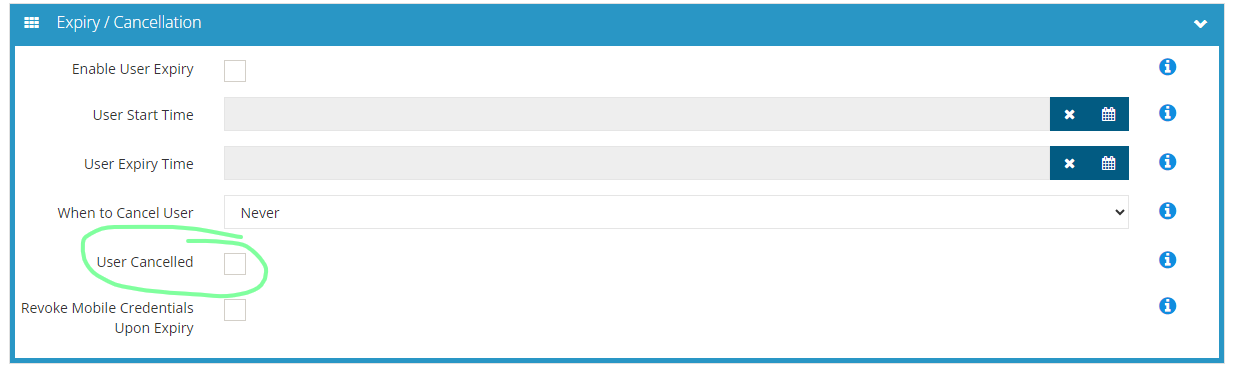
Cancel/disable a user with the User Cancelled checkbox
Permission Groups
For sites with multiple users, permission groups let you create a standard set of access rules once and apply them to many users. Common approaches:
By role — Warehouse Staff, Admin Staff, Management
By building/floor — Ground Floor, Level 1, Server Room
By hierarchy — Base access for all staff, with elevated groups for supervisors
Permission groups are managed at Configuration > Users > Permission Groups.
5. Schedules and Time Periods
Time periods control when users can access doors or areas, and when doors automatically unlock or lock.
How Time Periods Work
A time period becomes active and inactive based on the current day and time. For example:
Monday to Friday, 8:00am to 6:00pm — front door unlocks automatically
Outside those hours — front door locks and requires a credential
Setting Up a Time Period
Navigate to Configuration > Scheduling > Time Periods
Configure the weekly recurring times for each day
Add calendar exceptions for public holidays or special trading days
Inception Time Periods
Calendars
Calendars allow specific dates to override normal schedules — public holidays, shut-down periods, or extended trading hours.
Navigate to Configuration > Scheduling > Calendars to manage calendar dates.
Three types of date entries are available:
Single dates — a specific date, optionally recurring annually
Date ranges — a block of consecutive days
Calculated dates — e.g. "second Tuesday of every month"
Scheduler
The Scheduler page provides a simplified view to adjust automatic door unlock/lock times and area arm/disarm times without editing core configuration.
Navigate to Configuration > Scheduling > Scheduler.
Verifying Your Schedule
Use the Calendar Preview feature on the Time Periods or Calendars pages to check what times a time period will be active on any future date.
6. Reviewing Access and Event History
Inception stores a log of every event — door access, arm/disarm actions, failed attempts, system changes, and more. Up to 250,000 events are stored.
Viewing Events
Navigate to State / Control > Review Events
The last 24 hours of events (up to 500) load automatically
Click Load More for additional events, or Load All to retrieve everything
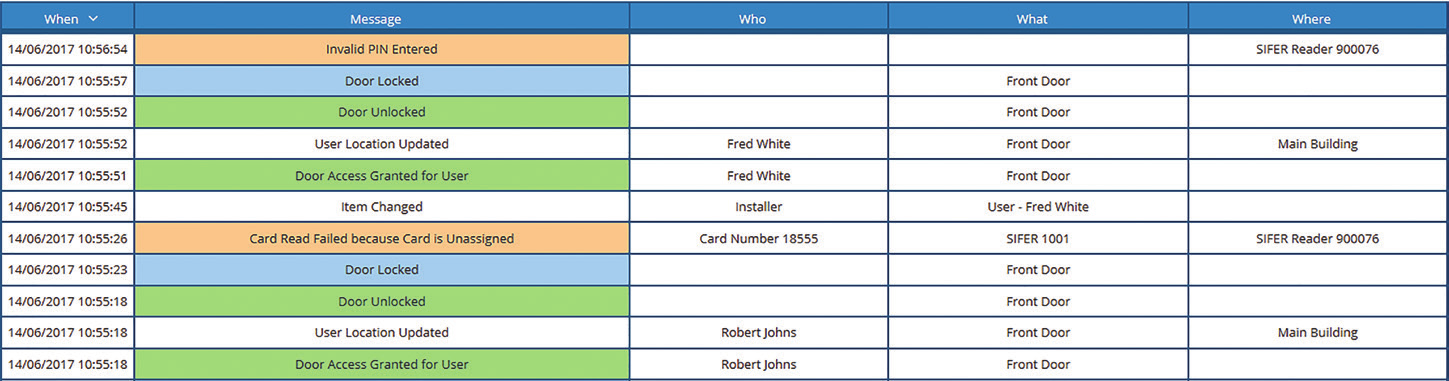
Review Events
Event Categories
-
Door access attempts, grants, and denials
-
Area arm/disarm events and alarms
-
Module connectivity and power issues
-
Controller resets, config changes
-
User account and programming changes
Filtering Events
Use the filter options at the top of the page to search by:
Time range — narrow down to a specific window
Category — focus on access or security events only
Keyword — search across message, user, door, or location
Exporting Events
Once filtered to what you need, use the toolbar buttons to download:
Download CSV — for use in Excel or other tools
Download PDF — for a formatted printable report
7. System Warnings and Messages
Inception notifies you of issues through two types of alerts visible in the top bar of every page.
System Warnings (orange)
Warnings indicate an issue currently present in the system — such as a module offline, power fault, or communication failure. These require attention.
What to do: Contact CXI as soon as possible. Do not ignore persistent warnings as they may affect system performance.
System Messages (blue)
Messages notify you of events that have already occurred and resolved — such as a previous alarm or a module that came back online. They simply need to be acknowledged.
To acknowledge: Navigate to System > System Overview, find the message, and click Acknowledge Message.
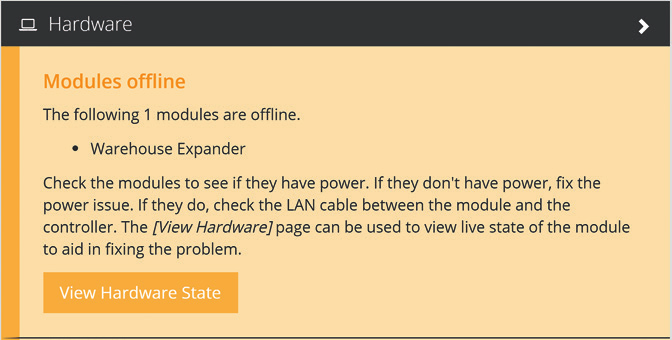
System Warning Message
If you see warnings you do not recognise or cannot resolve, contact CXI on 1300 798 325
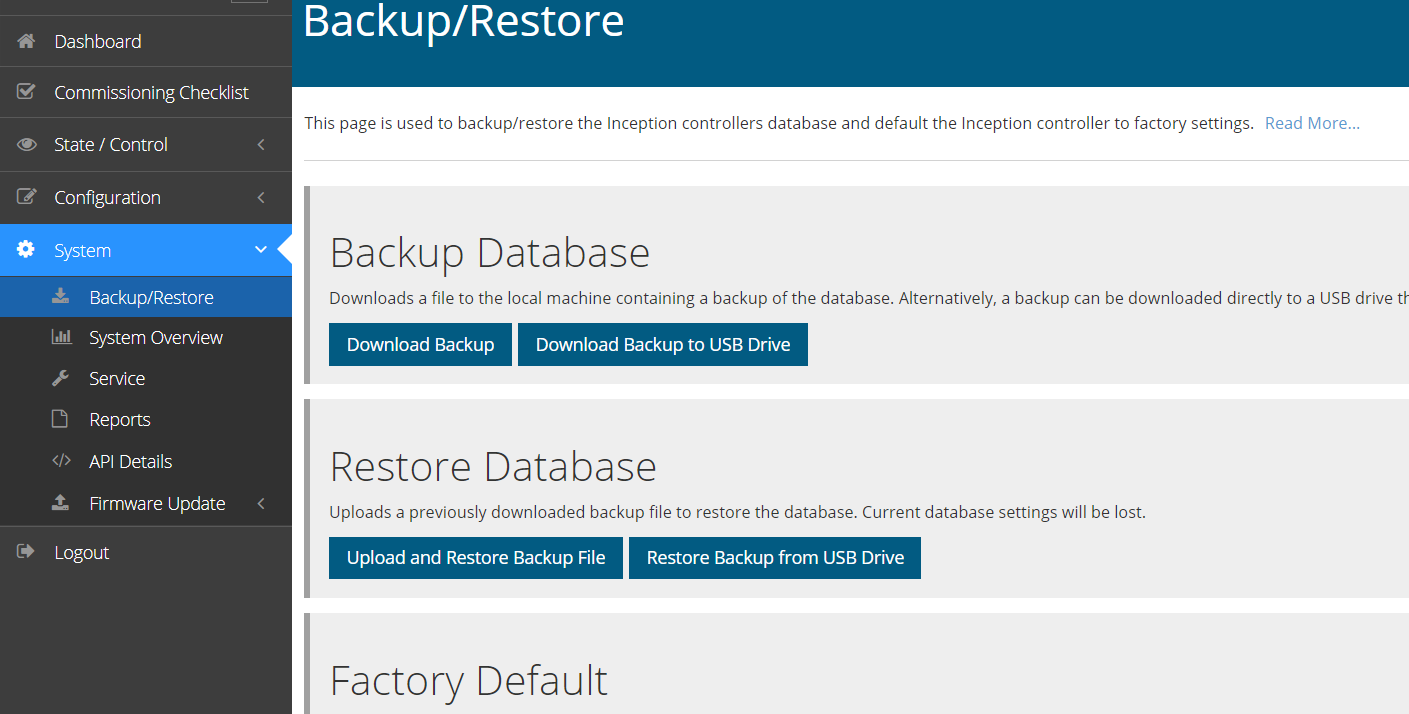
8. Database Backup
A database backup saves a copy of all system configuration — users, permissions, schedules, and settings. If something goes wrong (power surge, accidental change), the backup can be restored.
CXI recommends taking a backup after any significant programming change.
How to Take a Backup
Navigate to System > Backup / Restore
Click Download Backup
Save the file to a secure location (e.g. OneDrive, shared drive, or USB)
Inception Backup Section
Need Help?
Contact the CXI support team for any issues with your Inception system.
This guide covers common end-user functions. For installer-level configuration, contact CXI directly.